As a video creator, you know that attention spans are short, and concise content is key to engaging your audience. That’s why learning how to shorten videos on your iPhone is an essential skill.
In this step-by-step guide, I’ll show you how to trim your videos using built-in tools on your iPhone. By the end, you’ll be able to create more focused, impactful videos that hold your viewers’ attention from start to finish.
What is Shortening a Video on iPhone?
Shortening a video on an iPhone simply means trimming the length of your video to create a more concise, engaging piece of content. The good news is, you don’t need any fancy third-party apps to do this – your iPhone has built-in tools that make it easy to trim your videos with just a few taps.
Whether you want to cut out awkward pauses, remove unnecessary footage, or just create a shorter version of your video for social media, learning how to shorten videos on your iPhone is a valuable skill for any content creator.
How to Shorten a Video on iPhone
Now that you understand what shortening a video entails, let’s dive into the steps for trimming your videos on an iPhone. By using the built-in tools, you can efficiently edit your videos without the hassle of downloading additional apps.
Follow along with the steps below, and you’ll be creating concise, engaging videos in no time.
Step 1: Open the Photos App
To get started, locate the Photos app on your iPhone’s home screen and tap to open it. Once you’re in the Photos app, find the video you want to shorten and select it.
With the video open, you’re ready to move on to the next step.
Step 2: Tap Edit
In the top right corner of the screen, you’ll see an ‘Edit’ button. Tap this button to open the video in the editing interface.
Here, you’ll have access to various editing tools, including the ability to trim your video.
Step 3: Adjust the Start and End Times
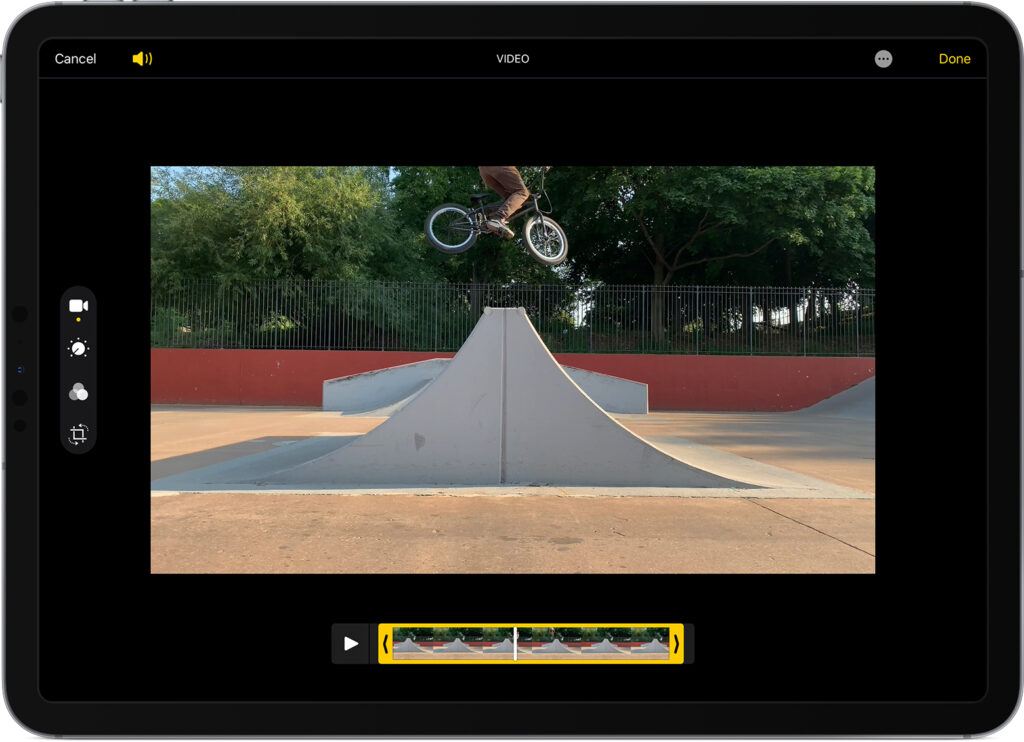
Once you’re in the editing interface, you’ll notice a video timeline at the bottom of the screen with sliders on both ends. These sliders allow you to set new start and stop times for your video.
- Drag the sliders to your desired points on the timeline. As you adjust the sliders, you’ll see the video frame update to reflect your changes. To preview your trimmed video, simply tap the play button.
- Take your time to find the perfect start and end points for your shortened video.
Remember, the goal is to create a concise, engaging piece of content that captures your audience’s attention.
Step 4: Save Your Shortened Video
Once you’re happy with your trimmed video, tap the ‘Done’ button in the bottom right corner of the screen. You’ll be presented with two options: ‘Save Video’ and ‘Save Video as New Clip’.
If you choose ‘Save Video’, your trimmed version will replace the original video. If you want to keep both the original and the trimmed version, select ‘Save Video as New Clip’.
Step 5: Use the Trimmed Video
Your newly trimmed video will now be available in your Photos app, ready for you to share, upload, or further edit as needed. Whether you want to post it on social media, send it to friends and family, or use it in another project, your shortened video is just a few taps away.

Picture Resources: https://support.apple.com/
Video Editing Tips
Tips for Maintaining Video Quality
When trimming your videos, it’s essential to avoid excessive cutting, as this can negatively impact the overall integrity of the video. Stick to using the built-in tools on your iPhone to ensure that your video quality remains high throughout the editing process.
Zeemo makes your videos perfect
Now that you’ve mastered the art of trimming videos on your iPhone, why not explore more advanced video editing techniques? From adding filters and adjusting color to incorporating music and sound effects, there are countless ways to enhance your videos and make them even more engaging for your audience.
If you’re looking to take your videos to the next level, consider adding captions or subtitles. Not only do captions make your content more accessible to a wider audience, but they also boost engagement and improve overall watch time. Discover how easy it is to add subtitles to video with Zeemo or explore the benefits of automatic captioning for your videos.

Resize video online with one click
If you want to post videos to social media, you need to consider not only shortening the video but also the video size differences on different platforms. Zeemo provides you with the best solution.
- Upload a video: Upload the video to Zeemo’s workspace, click on the video and go to Zeemo’s built-in editor.
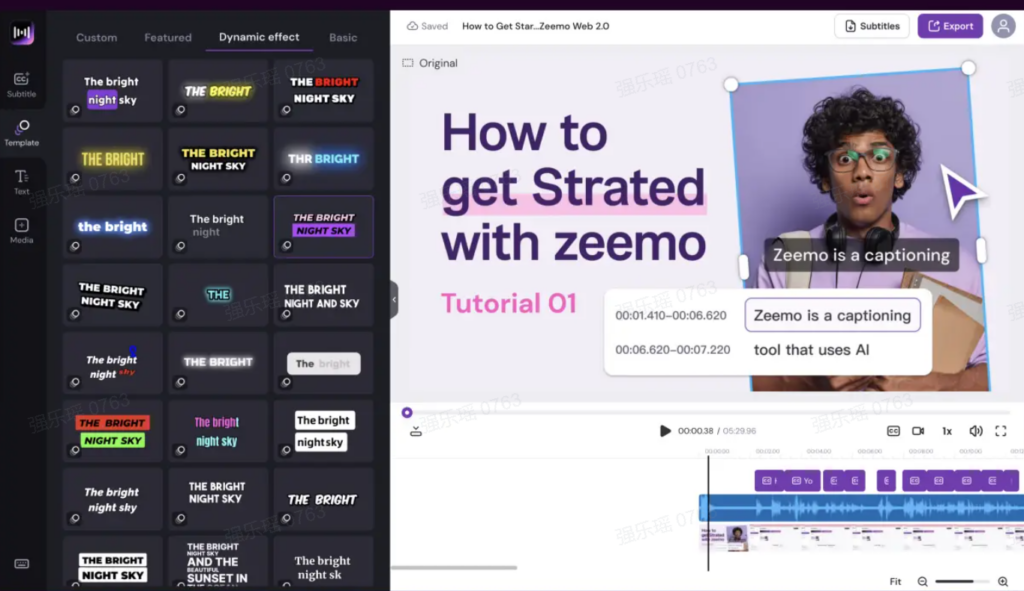
- Resize video size with one click: Click the “Original” button at the top of the video screen on the editor page, select the video size you need to resize and click it.
- Export Video: You can also add dynamic effects to the subtitles, or add titles to the video, etc., and then just export the video.

Benefits of Using Zeemo to Produce Video
- Ease of Use: Zeemo has user-friendly interfaces.
- Quick Downloads: You can save videos quickly with just a few clicks.
- Auto-Generate captions: Zeemo can recognize nearly 100 languages and automatically generate captions for them, greatly improving the efficiency of video creation.
- Translate video: Zeemo can automatically translate video subtitles into up to 113 languages.
- Additional functions: Additional functions are provided within the application, such as video editing, the ability to resize videos, convert video audio to text, etc.
- No ads: No annoying ads or other pop-ups on Zeemo pages
By mastering the art of trimming videos on your iPhone, you’ll be well on your way to creating engaging, concise content that captivates your audience. If you’re looking to take your video editing skills to the next level, we invite you to explore our products and discover how Zeemo can help you streamline your workflow and enhance your videos with ease. Join us on this exciting journey and unlock the full potential of your video content!
Shortening Video By iMovie
You can also use the editing software iMovie on iPhone to adjust the video. iMovie includes a range of video effects and tools like color correction and image stabilization, but is designed to be accessible to users with little or no video editing experience.
Here’s a condensed iMovie video editing tutorial in just five steps.
Step 1: Open iMovie and Start a New Project
Launch iMovie and click on ‘Create New’ followed by ‘Movie’ to begin a new project. Next, import the video clip you wish to edit.
Step 2: Add the Video Clip to the Timeline
Drag your video onto the timeline at the bottom of the window. Make sure the clip is selected, so you’re ready to start editing.
Step 3: Trim the Video Clip
Move the cursor to the start or end of the clip until the trim tool appears (it looks like a bar with arrows). Click and drag inward to trim off the unwanted parts.
Step 4: Split and Remove Unwanted Sections
To remove a section in the middle of a clip, move the playhead to the position where you want to cut, then select ‘Actions > Split’ on iOS. Select the part you want to remove and press the ‘Delete’ key.
Step 5: Export Your Edited Video
After editing, click on ‘File > Share > File’ to export your video. Choose the appropriate resolution and format, then save it to your desired location.
Additional Tips:
- Explore iMovie tutorials for advanced techniques.
- Familiarize yourself with keyboard shortcuts to speed up the editing process.
- Regularly save your project to prevent data loss.
Mastering the basics of video editing in iMovie is an essential skill for any video editor. With practice, you’ll be able to produce professional-quality videos efficiently. Keep exploring iMovie’s features to enhance your video editing skills.
Common Issues and Fixes
Sometimes, you may encounter issues when trimming your videos, such as the edited video not saving correctly or the app crashing during the editing process. If you experience these problems, try restarting your iPhone, ensuring you have enough storage space, and updating your iOS to the latest version. These simple steps can often resolve common video editing issues.


